The Eurekan Explorer's Guide to the Forbidden Land
With this page, I aim to create a comprehensive, complete and beginner-friendly guide to Eureka. This guide will not contain any story spoilers, but will contain maps, locations and descriptions of quest objectives. Written from an individual's Aether Data Center experience!
This guide was published @ August 2021
Contact me if you spot mistakes or have additional info to add!
I have also made a warped lockbox farming list
What is Eureka?
The Forbidden Land, Eureka, is an instanced area that up to 144 players can explore simultaneously. It was first released during patch 4.25 in 2018 and subsequent patches added new regions to explore.
Eureka has it's own storyline and a special open dungeon that can be entered by 56 players at once. To enter this dungeon, you will need to complete the main Eureka storyline first.
In Eureka your elemental level decides how strong you are and how you will fare against enemy attacks. This leveling system is independent from your normal EXP. You start at Elemental level 1 and reach up to 60 (elvl 60). Through leveling and story, you can explore the various zones Eureka offers, Anemos, Pagos, Pyros & Hydatos. Eureka is necessary for your Stormblood Relic weapons and also offers various glamour items, such as dyeable versions of your job gear.
Eureka has it's own echo boost of roughly 180% (which is insane) since patch 5.1. The Echo is not active in the Baldesion Arsenal. You can also ride mounts from the start in Eureka.
Unlocking
You can unlock Eureka by starting the quest 'And We Shall Call It Eureka' in Rhalgr's Reach (X:9.8 Y:12.5) by talking to the NPC Galiena with any disciple of magic/war above level 70. (note, you first must have completed the main scenario quest called 'Stormblood' in order to be able to do this.)
After unlocking Eureka you can enter it any time by talking to the NPC Rodney in Kugane at Pier #1 (X:8.5 Y:14.2). If entering as a party, the party leader must speak to the NPC.
(When registering to enter, all party members must be in Kugane.)
While in Eureka, players can create parties, invite players to parties, disband them and vice versa.
FAQ
How many Crystals do I need for my dyeable job gear?
1300 Protean Crystals and 3 Pazuzu's Feather for the weapon. A full set of Job Armor (minus weapon) will cost you 3000 Protean Crystals as well as 750 Anemos Crystals.
I already know how Eureka works, how do I get my shiny Elemental Armor? A quick summary;
Obtain 1300 Protean Crystals + 3 Pazuzu's Feather.Obtain 31 Frosted Protean Crystals+ 6 Louhi's Ice + 500 Pagos Crystals.Complete your Relic Weapon of choice to the Pagos step (ilvl 370: Elemental weapon)Unlock 56 different Logos Actions.Obtain at least 40 Pyros Crystals. Each gearpiece will cost you 40. A full set will cost you 200 Pyros Crystals. Trade them in at the Expedition Artisan in Pyros. (can only be done after unlocking at least 50 different Logos Actions)Obtain at least 50 Hydatos Crystals. Each gearpiece will cost you 30-50. A full set will cost you 190 Hydatos Crystals. Trade them in at the Expedition Artisan in Hydatos. (can only be done after unlocking at least 56 different Logos Actions)No, you do not need to complete your weapon beyond Pagos to unlock the Elemental Armor exchange.
How difficult is BA?
Differs per person, but generally, mechanics are most comparable to a hard 24-man raid. The real difficulty lies in the no-rez restriction as well as the organizing that is needed. Most BA groups will have callouts for bosses in Discord.
Elemental Level & leveling up in Eureka
As said before, Eureka features its own leveling system in the form of elemental levels. Leveling in Eureka can be considered somewhat of a grind, but don't let that deter you. There are ways to make it easier on yourself and you can go at any pace you want.
Typically, one can grind in Eureka by chaining (killing the same type of enemies multiple times in a row) mobs that are the same, +1 or +2 levels above you if you're feeling brave. Do not take on enemies that are 3 levels above your level, and be careful with solo-engaging enemies that are 2 levels above you. Eureka scales brutally fast and enemies 5 levels above you can possibly kill you in one hit.
Eureka has it's own challenge log (Clog) that you can fill by chaining mobs your own level. Each element has two entries in the Clog and doing all of the challenges will net you your first 7 levels easily. Chaining enemies will also net you more EXP on each kill so it's very viable to keep your chain going. The Clog will mention Sprites and Ashkin as well. Ashkin are enemies that spawn between 6 PM - 6 AM Eorzan time. Sprites spawn during Extreme weather conditions, such as blizzard, heatwaves, gloom etc. Ashkin and Sprites take a significantly longer time respawn than the other enemies.
Once you get to a comfortable level where not every single enemy on the map will kill you instantly, you can try to go to NM's and move into prep parties. More on that in the section below.
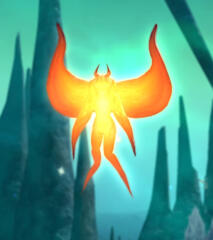
You might see an Eurekan Elemental occasionally in Eureka, typically a fairy named like [ZONE NAME] Elemental. In the first zone, Anemos, this would be the Anemos Elemental. They will cast a blue AoE when you get close and you can stand in it to receive an EXP buff, a damage increase and a regeneration buff. Note that the fairy can be killed by enemy attacks and that it will disappear if it casts the AoE multiple times. It will then move to another part of the map at a random location.
The Potion of Harmony can be bought of the marketboard or be crafted and will net you a 10% gain on all elemental EXP in Eureka. The buff from the potion lasts for 60 minutes and 90 if you use a HQ potion. Note that you can only use the potions while inside Eureka.
If you are in a party, you will get less EXP from killing enemies. If your party members are 8 levels above you, you will get none at all (with the exception of EXP gained from NM's)! EXP from enemies is decided by the amount of players attacking them, so some parties decide to grind for EXP by killing enemies 5 levels above them, as they will grant an enormous amount of EXP for the whole party. Inside Eureka, it is very normal to hop in and out of parties frequently, especially if you are levelling. This also means that if you see someone else attacking enemies, you do not help them as it will take away a part of their reward. If you do want to help someone low-level getting slaughtered by a high level enemy, get ready to raise them when they die.
It is possible to lose EXP and levels in Eureka! this can start as early as from Elemental level 6 and it can be quite a setback if you're new. Onwards from Elemental level 11 you can even Delevel! But fret not, there is a solution. If you die in Eureka, you only lose Elemental EXP if you return to the entrance of the instance (or leave, disconnect and leave, etc.). If someone else raises you, you will not lose any Elemental EXP. Typically, you have 10 minutes for someone to come and pick you up, so if you're dead you'd best /shout your <pos> (your position coordinates, which will help others find you sooner) and pray that someone is nice enough to raise you. Bring along a Phoenix Down just in case whenever you enter Eureka so that you may raise others even if you are not a caster!
Generally I have had no bad experiences in Eureka so far, but sometimes an instance can be empty and no one can come to raise you. You can check how many other people are making their way through the same Eureka instance by checking out the party member list and going to the adventurer list on the right. Sometimes an instance will be 'locked', meaning that no new players can enter the instance. Usually an instance where no new players have joined in 30 minutes is locked.
An instance that is brand new is referred to as 'fresh'.
Notorious Monsters
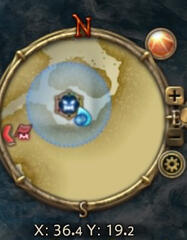
In Eureka, leveling and gaining crystals revolves all around so called Notorious Monsters (also called NM's). NM's are FATE-like encounters indicated by a blue circle on the map (picture in links and images section) and reward a lot of EXP. Notorious Monsters spawn when you kill certain groups of enemies (also called mobs) repeatedly. For example, killing the elvl 6 Flowering Sabotenders in Anemos will eventually result in the elvl 1 Sabotender Corrido NM spawning!
NM's can also reward crystals and lootboxes, (and so many poetics, seriously!) but you need to be on the right elvl to receive them. For example, if you want to receive the full rewards from the elvl 35 Cassie NM in Pagos you will need to be at least elvl 34 yourself.
NM's often spawn in territory with higher elvl mobs placed around them, so you will have to learn how to sneak past them if you want to reach the higher level NM's.
Spawning such a NM is often referred to as 'Prep/Prepping' and you can occasionally find Prep parties hosting a NM train. Activating a NM makes it 'pop' and people will often call out the location in /shout to attract other players towards it.
Some NM's will only spawn under certain conditions as well, usually restricted by day/night and a type of weather. For example, the elvl 20 Pazuzu NM will only spawn in Gale Weather conditions, and the mobs you need to kill will only appear at night.
A NM scales to the amount of players in the instance when it spawns, meaning that a NM spawning with 4 players in the instance will have way less health than a NM that spawns when there's 50 players in the instance.
Furthermore, once a NM has spawned it cannot spawn in the same instance anymore for at least 120 minutes in real-time. A NM that hasn't popped yet is called 'Up' and a NM that has been spawned and killed in the instance is called 'down'. People might ask for a tracker in the instance so they can see what NM's are up. You can create your own tracker here and share them with others.
An important thing to notice about NM's is that they are never pulled instantly. In Eureka, it is considered common courtesy to wait for other players to show up for the NM. If you succesfully spawn an NM, it is polite to /shout the location and wait for a few minutes so other players have a chance to get in on the NM.
Some NM's have special drops besides crystals and boxes. I will go into detail over these in the respective zones.
The Magia Board, gear and BiS
In Eureka you will be making use of the Magia board to enhance your defensive and offensive abilities. In Eureka, there are 6 elements that are assigned to enemies. The same 6 elements are also used on the Magia Board.
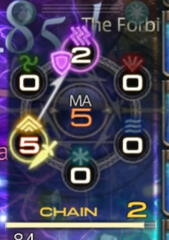
At the start of Eureka, you will have a quest available that gives you a Magicite to put into your Magia board (picture in links and images section), which you can do at the Magia Melder near the entrance of the instance. You can then decide to strengthen certain elements on the Magia Board which will influence your attack and defensive power against enemies. For example, putting a Magicite into the fire element slot on the Magia Board will make you hit harder against ice elemental enemies, and have you take less damage from fire elemental enemies.
In your progression through Eureka you will receive 5 Magicite in total, at elvl's 3, 5, 13 & 17.
You can also spin your Magia board and swap your elements by clicking on it, or clicking on the enemies and swapping to offensive or defensive Magia. However, you can only spin 5 times at maximum, then you need to refresh your Magia Aether by interacting with the Magia Melder.
It is actually possible to get a total of seven Magicite, but you need to trade in rare NM drops to the Expedition Engineer found near Gerolt. More on this in the sections about Pyros and Hydatos.
If you are wondering what gear is Best In Slot (BiS), for casual Eureka fans the current tier gear and above is enough. If you are planning on sticking around, you might want to look into buying either 2 Cryptic Seals (Disciples of War) or 3 Damascene Cloth (Disciples of magic). You can trade those at Pier #1 in Kugane to the Nostalgic Fellow/Gear Exchange (X: 7.8 Y:14.3) for Kirin's Osode or the Vermillion Cloak (depending on your class).
For those who have completed Eureka, BiS is the Elemental gear +2 (+1 does not matter, it is not as good as the current tier gear) on the Head, Arms, Legs, Feet. The Speed Belt and the Cassie Earring are too expensive for most casual Eurekans but you can buy them if you want to toss your Gil at something, I guess. They will grant you haste and make your GCD faster. The best weapon would be a Physeos Weapon with good rolls.
A special note about the Elemental +1/2 gear; you will need to complete the Pagos Relic step of your weapon, otherwise you will not be able to get the gear exchange.
Commonly used abbreviations in Eureka
| Abbreviation | Meaning | Additional Notes |
|---|---|---|
| LFG | Looking for group | Sometimes also worded as LFP (looking for party) |
| PT | Pull Time | Pull times are usually done in Eorzan time, such as Cassie pop, PT 12:45 ET |
| NM | Notorious Monster | - |
| Mob | A regular enemy | Example: A lvl1 ground squirrel is a mob |
| Prep(ping) | Preparing a NM by killing the same mobs repeatedly | 'LFG prep' is used to indicate you are looking for a prep party |
| any variant of Rez pls (coordinates) | This person needs someone to raise them at that location | help them. please. if they didn't specify coordinates ask for them. |
| BA | Baldesion Arsenal | - |
| KA | King Arthro | Notorious Monster |
| Penny | Penthesilea | Notorious Monster |
| Luigi | Louhi | Notorious Monster |
| Brothers | Mindertaur/Eldertaur | Notorious Monster |
| Pizza | Piasa | Notorious Monster |
| Batman | Grand Duke Batym | Notorious Monster |
| PW | Provenance Watcher | Notorious Monster |
| light dump | a player is going to empty their kettle at the forge | - |
Anemos
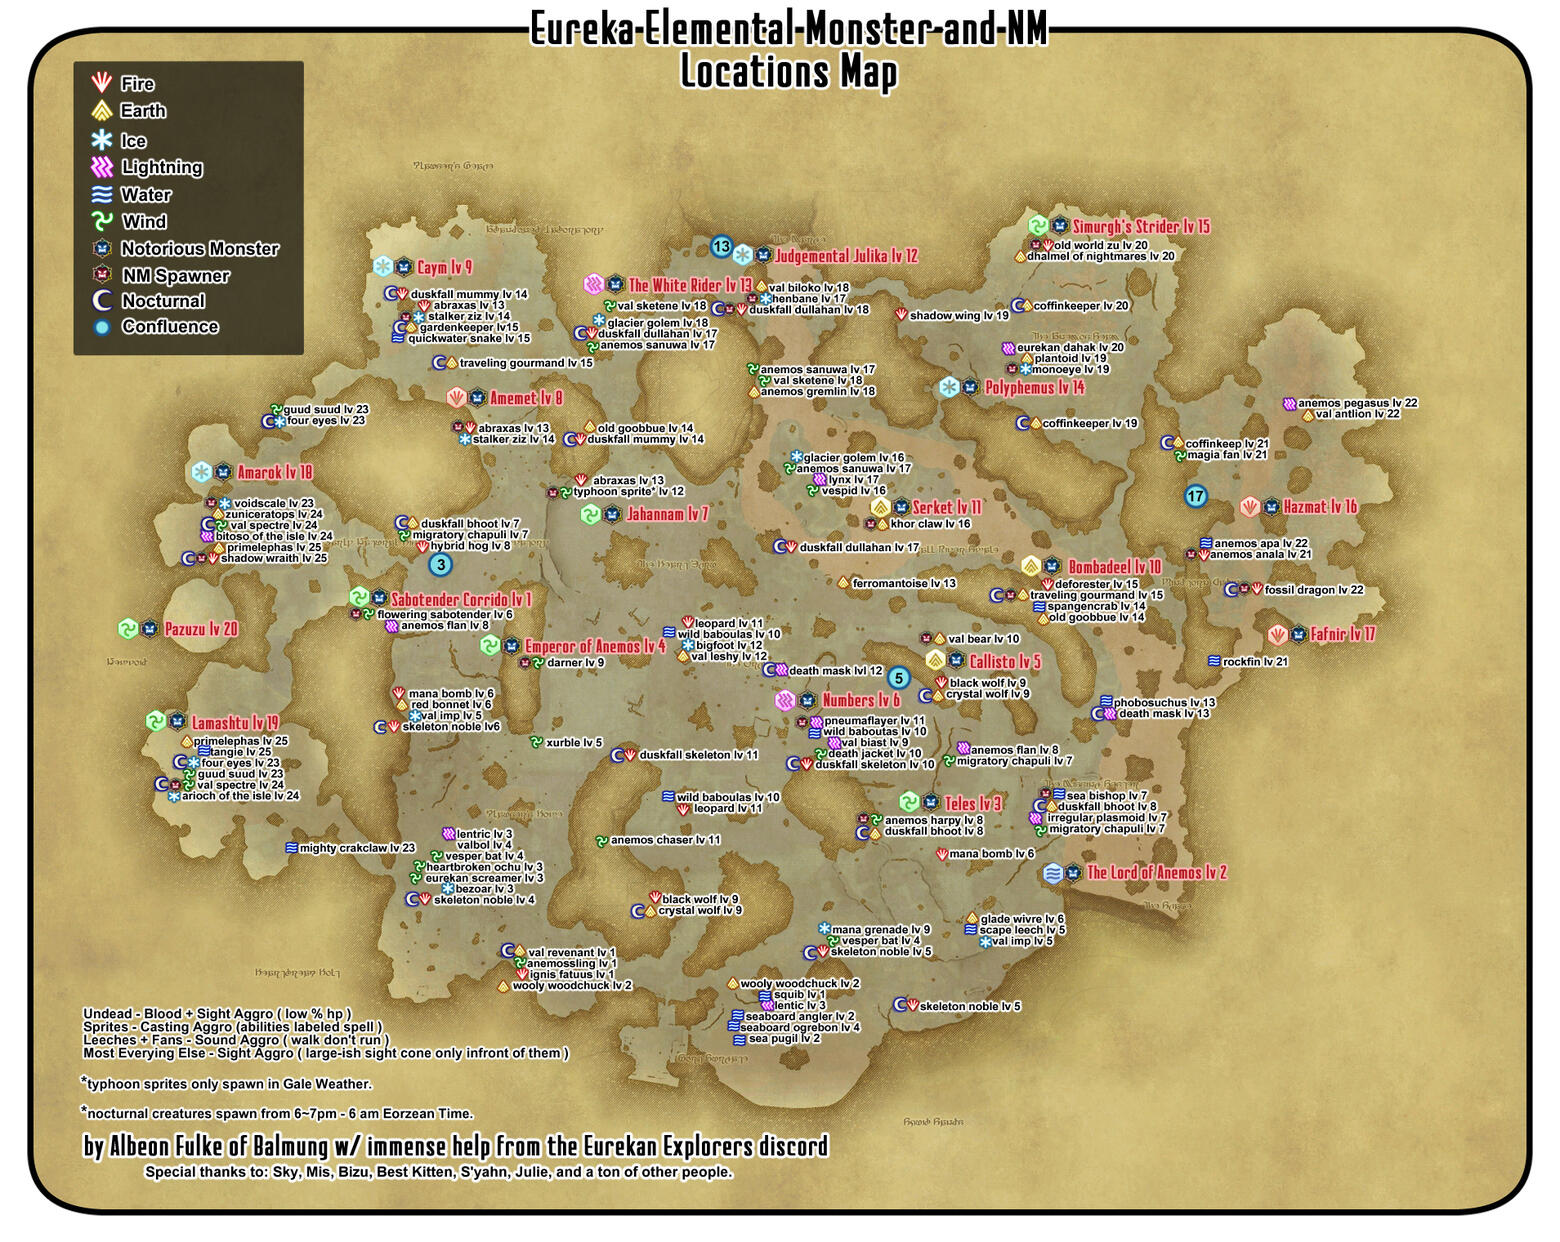
Map originally posted by maestar on Reddit here. Note how it details what mobs aggro to, AKA what type of engagement causes them to attack you.
Welcome to Anemos! This is where your journey into levelling and getting your Stormblood Relic Weapon/Augmented job gear begins!
To start of, you begin at Port Surgate and you can attune to the big Aetheryte right away. There will be some NPC's with a quest marker above their head that doesn't show up on your map that you can talk to, and you'll get your first Magicite. Gerolt is there as well and you will eventually be able to Augment and upgrade your job gear + weapon with Anemos Crystals and Protean Crystals by interacting with him. You can unlock Gerolt as soon as you have received your first Protean Crystal by talking to Krile first, then Gerolt.
You can aquire your first Protean Crystal by chaining mobs. Don't worry if it seems like you will get very little crystals, you actually get way more later, when you are able to safely join the NM train! You can exchange your Anemos Crystals for Protean Crystals at Gerolt's place as well. In Anemos, you can find Sprites during the following weather: Gales (wind sprites), Snow (ice sprites) and Showers (water sprites). Remember that even if you are a low level, you can still get EXP from doing NM's!
Upon reaching level 3 you will get a new quest for a new magicite. Proceed inside the Early Natural History Society Observatory at 13.5-20.2 and interact with the Confluence. (I recommend doing this during the day or at elvl 5+, as there will be enemies inside) Then return to Port Surgate and talk to Krile.
Upon reaching level 5 you will get another quest. Talk to Krile. Proceed to the The Orchard at 24.4-23.1 below the cliff and interact with the Confluence. Return and talk to Krile.
Once you reach level 9 you can attune to both Aetherytes, but make sure you don't die on the way to them. There's high level mobs around them. You can then teleport from Aetheryte to Aetheryte.
Upon reaching level 13, you can get access to another quest for a Magicite. Talk to Krile. Proceed to the The Val River Swale at 20.9-13.0 near the waterfall and interact with the Confluence. Return and talk to Krile.
Upon reaching level 17, you can get your last Anemos Magicite and do the quest to unlock Eureka Pagos, the next zone. Talk to Krile. Proceed to the Uncanny Valley at 32.8-18.3 and interact with the Confluence. Return and talk to Krile. Proceed to the Aethernet Control at 25.5-16.1 and interact with the Aethernet Relay. Interact with the Aethernet Relay again and trade 99 Anemos Crystals. Return and talk to Krile.
Click this link for a more extensive guide on the quests in Anemos.
You can now go into Pagos, but I'd advise going in at elvl 20 or higher, since the lowest level enemies in Pagos are elvl 20.
To complete your Anemos weapon, you will need special drops from the NM Pazuzu. Pazuzu will drop 3 Pazuzu's Feather if you complete the NM fate succesfully with a gold ranking at elvl 19 or higher. You can also buy the Pazuzu's Feather for 300 Protean Crystals from the Expedition Birdwatcher in Port Surgate.
The cap for the elvl in Anemos is 20. however, killing mobs that are elvl 20 in Anemos will still count towards your challenge log!
Doing NM's in Anemos will also reward you with Anemos Lockboxes. These can be unlocked by the Expedition Lockpick in Port Surgate (there is also one on Pier #1 in Kugane). You can get various rewards from them, ranging from Eurekan Potions, Materia, Glamour items to minions and a T-rex mount.
Other special drops in Anemos include:
The Emperor Hairpin glamour itemThe Scorpion Harness glamour itemThe Wind-up Mithra MinionThe Strider Boots (increases sprint duration in major cities)The Altar to Pazuzu (untradeable housing item)
Pagos
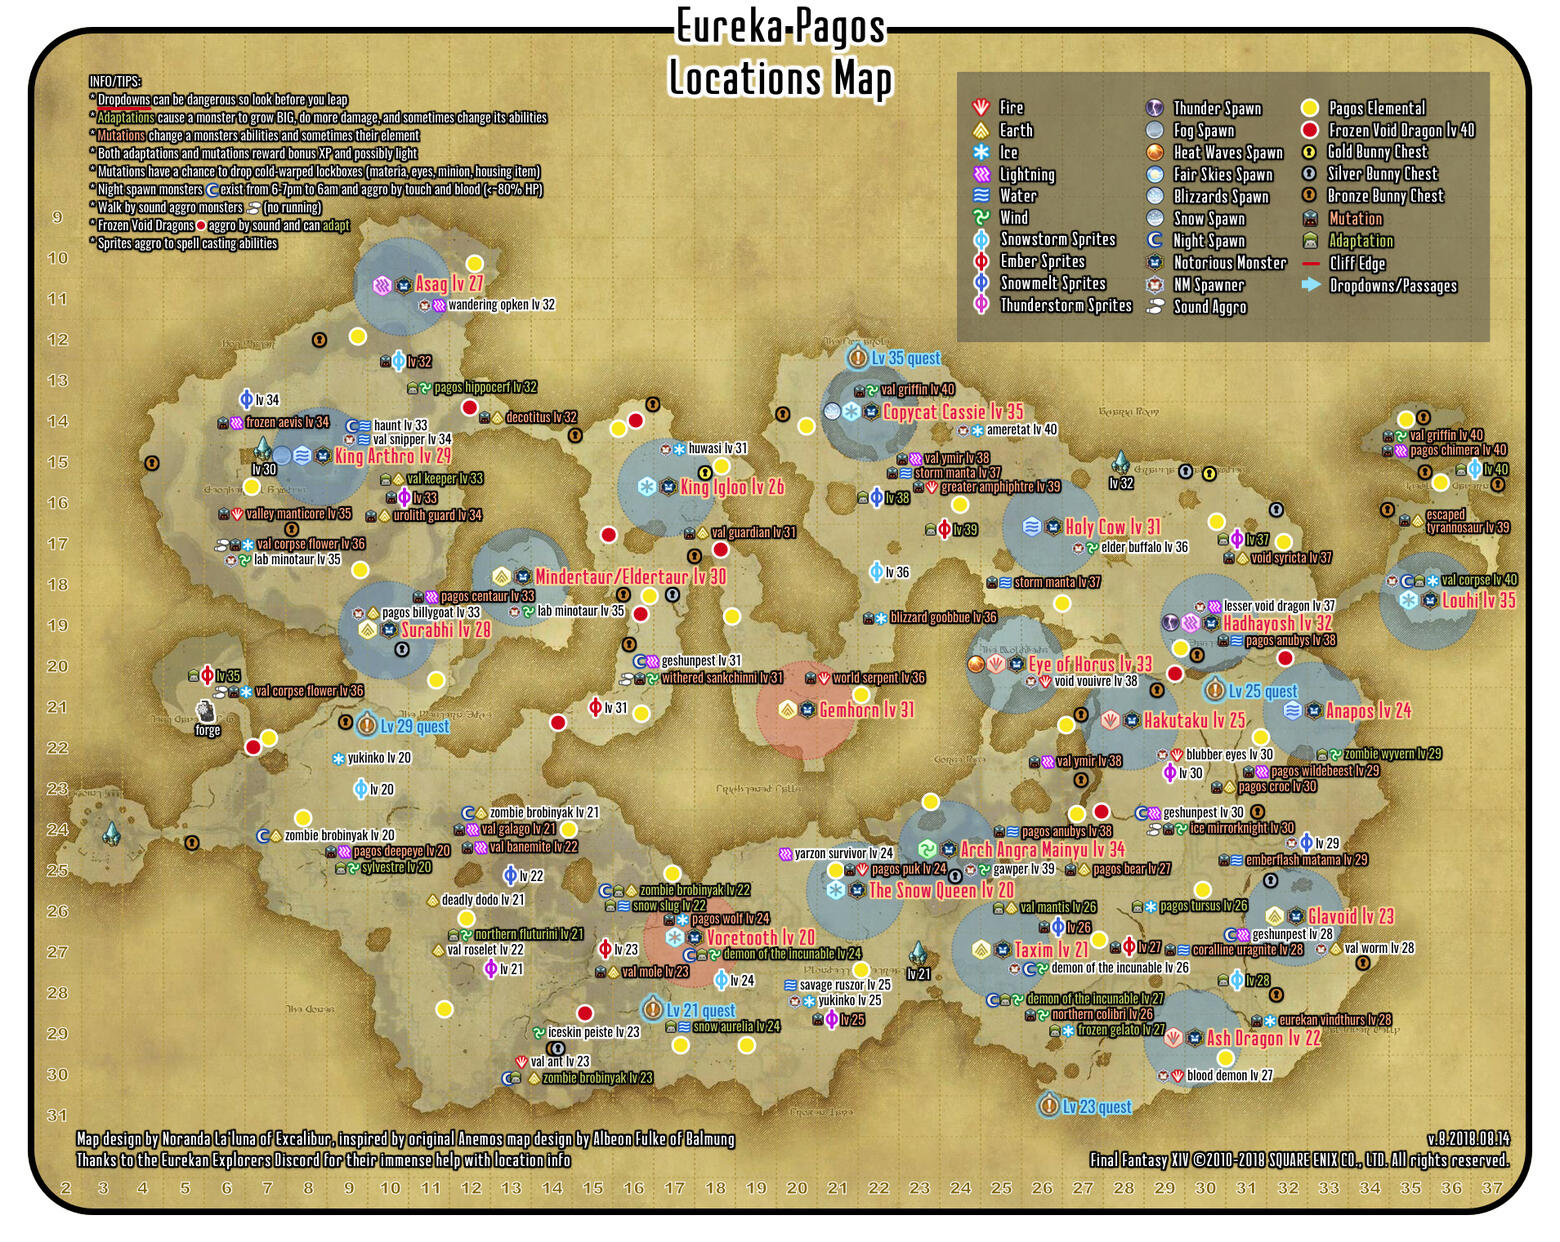
Map originally uploaded by WHM on reddit here.
Welcome to Pagos!
You can enter Pagos as soon as you finish the story quest line in Anemos, which you can do at elvl 17! Unfortunately, Pagos lowest level enemies start at elvl 20 and thus it can be very dangerous to try to go to the closest NM's. A lot of players recommend you go into Pagos once you hit elvl 20 or higher. The level cap in Pagos is 35.
In comparison to Anemos, Pagos is not designed to be player-friendly. Mobs can and will chase you for longer distances, there are a lot of cliffs that you can fall off and enemy placement can feel hostile. On top of that, there are elvl 40 Frozen Void Dragons (picture in links and images section) found sleeping on narrow routes on the map which will wake up and attack you if you run by them.
To avoid getting attacked by sleeping void dragons, you can WALK slowly past them. They will not attack you as long as you don't run near them.
Crystals only drop from NM's and the lowest level NM only drops 1 crystal! It may feel like everything in Pagos is designed to work against you.
Simply get on with the mob-grind and join the NM train if there is one. Pagos will often be empty so try to make friends in there if you decide to go to higher level areas.
There are 2 NM's that are nearly always active in Pagos, the so-called Bunny FATEs.
They are called Down The Rabbit Hole & Curiouser And Curiouser. On the map pictured above, they are colored in red. These give little EXP and no Pagos crystals at all. They will instead give you (if you are lucky) a Happy Bunny that accompanies you. You will receive a key item called the lucky carrot which you can use to find treasure chests with. It functions the same way as your Aether Compass. Your bunny will often lead you into high level territory, past cliffs and sleeping dragons, so it is not recommended to do these treasure hunts until you are at a high level.
Mobs can adapt or mutate. While they're adapting or mutating, you can stun them to prevent it from happening. Mobs that spawn NM's will never mutate or adapt. Mobs that adapt will grow larger, cause more damage and sometimes have different abilities. Mobs that mutate will shift their element and change their ability. Chaining these type of mobs can result in them dropping Cold-warped lockboxes. These lockboxes can contain rare rewards, like the /shiver emote. Adapted/mutated mobs will also reward more EXP.
At level 21 you can attune to the first Aetheryte (Viondette's Retreat) on the bottom side of the map, making it easier for you to reach the NM's in that section of the map.
Upon reaching elvl 21 you will receive your first quest. Talk to Krile. Locate the Depleted Aetherial Stream at The Cones (16.5-28.8) (upper level on a raised grassy hill). Return and talk to Krile.
Upon reaching elvl 23 you can do the second quest. Talk to Krile. Locate the Depleted Aetherial Stream at The Val River Belly (26.7,30.7). Return and talk to Krile. You can now attune to the aetheryte at Geothermal Studies, which is surrounded by elvl 30+ enemies, so be careful.
Upon reaching elvl 25 you can do another quest. Talk to Krile. Next, locate the magicite at The Eastern Edge (30.9,20.7), and also inspect The Eastern Edge (30.7,21.0) and return to Krile. You can now attune to the aetheryte at Gravitational Studies. You can also speak with Gerolt any time after first speaking to Krile to unlock Eureka Pagos weapon enhancement. This also unlocks the kettle.
The kettle will be represented by a bar that fills slowly when you chain-kill mobs and NM's. Once the bar is full, it starts another. The kettle can hold a maximum of 9 bars, so it's best to empty it before it hits the cap. You can empty the kettle in the forge (location is shown on map). You will need to go via the Aetheryte at Gravitational Studies and drop down on the western ledge, then sneak by a sleeping dragon and several plant enemies. Emptying your kettle will reward you with Frozen Protean Crystals, which you use to augment your Anemos Relic weapon further. You will need 31 in total for a single weapon.
Other items you will need are 6 Louhi's Ice, dropped by the Louhi on Ice NM (picture in links and images section). You can also buy a Louhi's Ice at the Expedition Birdwatcher for 50 Pagos Crystals each.
Upon reaching elvl 29 you can do the fourth quest. Talk to Krile. Talk to Ejika Tsunjika on a ledge in The Western Edge. You will need to walk through Hot Water and drop down at (9.9,21.3). Return and talk to Krile.
Upon reaching elvl 35 you can do the final quest unlock Eureka Pyros. Talk to Krile. Locate the aether column at The Fumarole (21.8-12.4). Return and talk to Krile. Note that you will have to walk slowly by the Ameretats and avoid touching them, and stay out of the sight range from the Val Griffins.
Click this link for a more extensive guide on the quests in Pagos.
Special drops in Eureka Pagos include:
Glamour items, materia and Allagan platinum pieces, crafting materials, housing items, Triple Triad cards/ShiverHakutaku Eyes, used to craft a Golden Hakutaku Eye Cluster, which will make you able to receive gold rank on the NM Wobbler in the dark. Gold/silver rank on this NM does not affect the EXP you receive. Gold nets you the optical hat.The speed belt (will probably removed when belts are removed)Wind-up Tarutaru minionCopycat Bulb minionCassie Earring (rare, sells for literal millions on the market board)
Sprites spawn in Pagos during Heatwaves, Fog, Thunder, Snow and Blizzards.
A special note about Blizzard and fog weather, however. If it is Blizzard weather, chances are big that players will try to prep Copycat Cassie. Cassie will not spawn if other NM's are active at that time, and usually takes many high level mob pulls before popping. If you are grinding out Pagos, Cassie prep parties will generally appreciate it if you do not spawn any other NM during her weather. If you do spawn a NM, players might come over and pull instantly, so they can continue prepping Cassie.
The King Arthro NM (KA) has the same conditions, except that KA requires Fog weather conditions to spawn. Generally speaking, Ka is also easier to spawn.
TLDR; ask if people are prepping Cassie or KA if it is Blizzard or Fog weather before trying to spawn anything else.
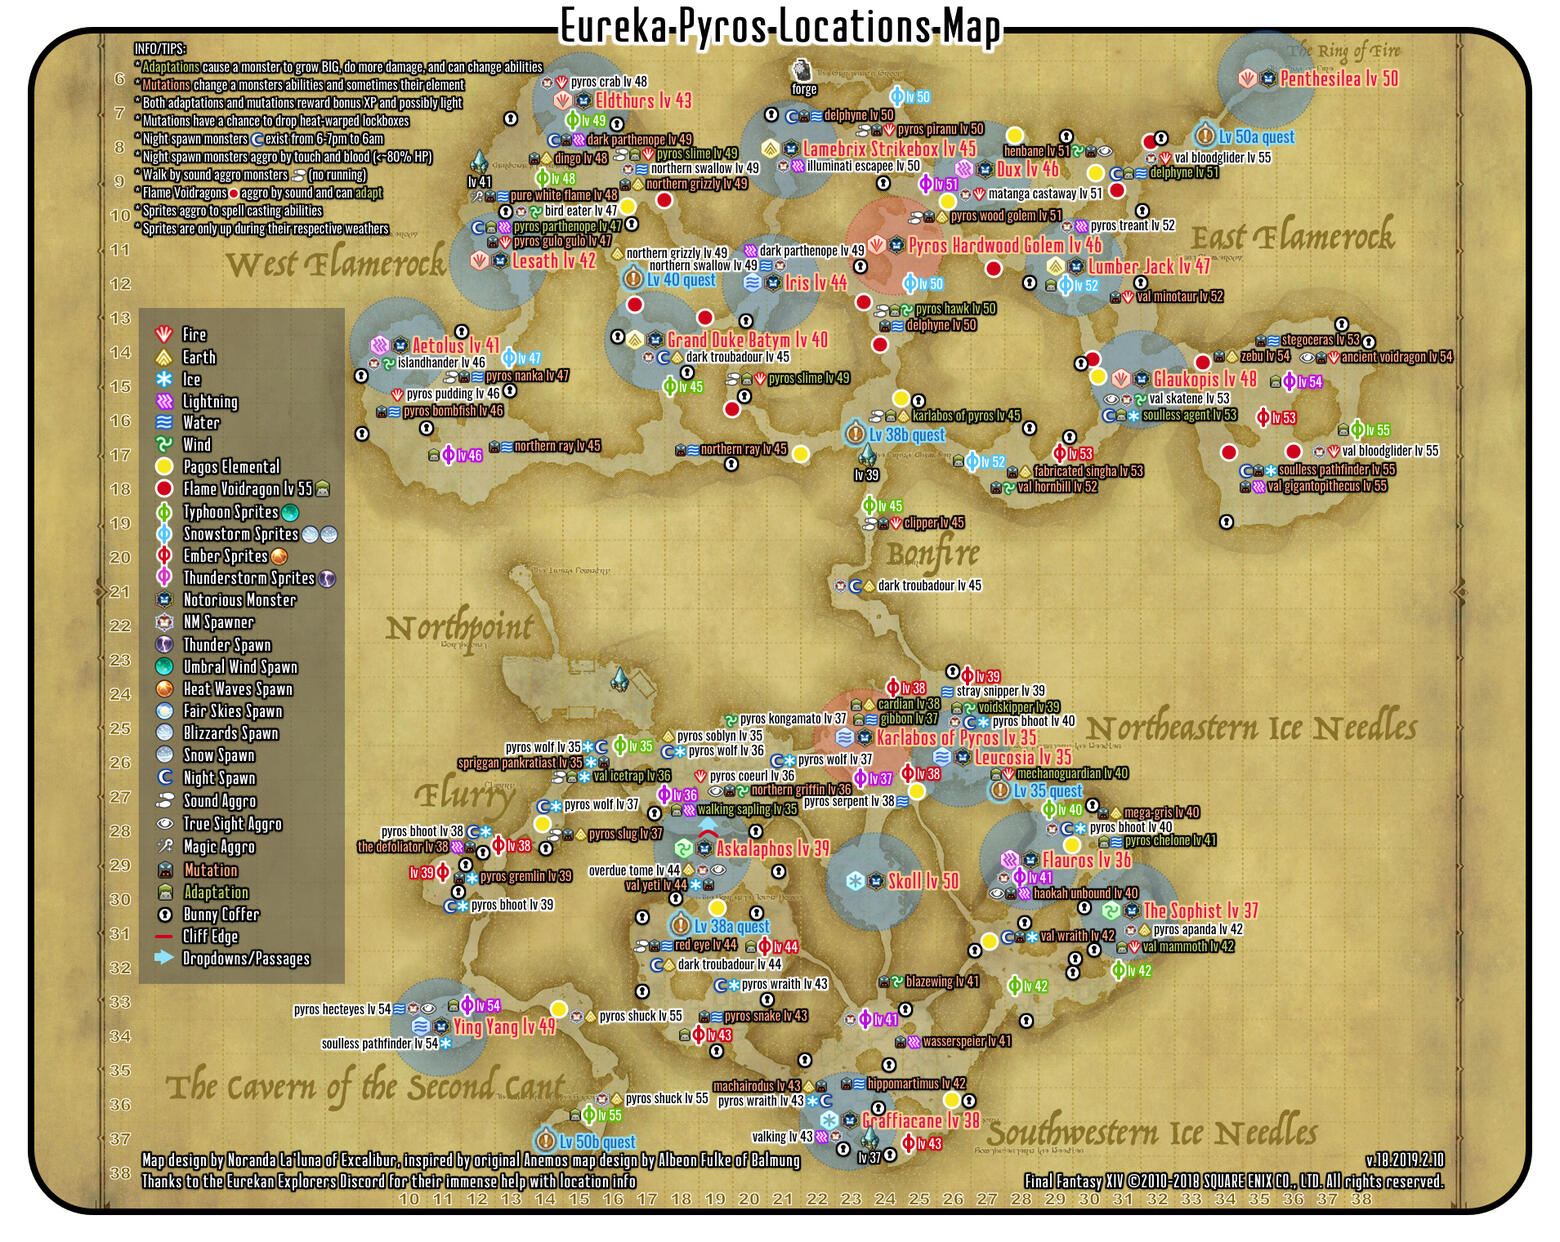
Pyros
Map originally uploaded by WHM on reddit here.
Welcome to Pyros!
If you've made it all the way through Pagos, then most of Pyros will feel like a relief. There are barely any cliffs and ledges and sleeping void dragons only appear in the upper part of the map. On top of that, you can usually give them a wide berth, as they aren't placed in such narrow spaces anymore.
Just like Pagos, Pyros got it's own Bunny FATEs going on, one called We're All Mad Here and one called Uncommon Nonsense. Bunny FATEs in Pyros are actually worth the trouble, especially after you reach elvl 46. After hitting that level, nothing in the bottom part of the map will aggro on to you or you bunny, which makes finding the chests a lot easier. (note; you will only get chest on the bottom side of the map if you complete the bottom side's FATE. the top FATE will have you traversing high level territory.)
You can also obtain a new Magicite for your Magia Board through very rare NM drops. These are as following.
Lamebrix's Dice from the Thirty Wacks NMSkoll's Claw from the Heaven's Warg NMYing Yang's Tissue from the Haunter of the Dark NMTo get any of these drops, you must be 1 elvl below or higher than that compared to the the NM. If you're however willing to spend Gil, you can also just buy these items of the Marketboard.
Eureka Pyros also introduces you to Logograms and Mnemes, which you can use to make Logos Actions with. Logos Actions are abilities you can use in Pyros and beyond. You can carry three Logos Actions initially, and activate one at a time. Some actions/buffs will stack with other actions, like Spirit of the Remembered and Shell. Some actions can only be used by certain classes.
To make a Logos Action, one must gather Logograms. Then you can appraise your Logograms at Drake, an NPC found in Northpoint. Drake will convert your Logograms into Mnemes with a slight RNG to which Mnemes you will receive. Then you can put your Mnemes into the Logos Manipulator and combine them into Logo's Actions. If you want the Glamours from Eureka, you will need to make every single Logos Action at least once, and if you want to finish your weapon, you will need to make 30 different Logos Actions at least.
How do you get Logograms? there are many ways, but the easiest is to buy them directly off the Marketboard. I will list the methods below for those who don't want to spend gil on Logograms.
Conceptual Logogram: Kill same- or higher level sprites, bronze bunny treasure coffersFundamental Logogram: Bronze bunny treasure coffers, level 41 Thunder sprite kills, hitting 30 on your chainOffensive Logogram: Gold bunny treasure coffersProtective Logogram: Gold bunny treasure coffers, NM's (Flauros, Askalaphos, Lesath, Lamebrix Strikebocks, Glaukopis, Skoll)Curative Logogram: silver bunny treasure coffers, NM's (Leucosia, Graffiacane, Aetolus, iris, Lumber Jack, Penthesilea)Tactical Logogram: Heat-warped and Moisture-warped Lockboxes, which are found in the next zone, HydatosMitigative Logogram: Lvl 46 Thunderstorm Sprites, Sprite Adaptations (Lvl 43 Ember Sprite, Lvl 46 Thunderstorm Sprite), Ashkin AdaptationsInimical Logogram: Sprite Adaptations (Lvl 52 Snowstorm Sprite, Lvl 54 Thunderstorm Sprite, Lvl 55 Typhoon Sprite) & NM's (The Sophist, Grand Duke Batym, Eldthurs, Dux, Ying-Yang)
A full list of Logos actions and how to make them can be found on ffxiv-eureka.com. This handy site also lets you keep track of which logograms you have made!
As soon as you create 50 different Logos Actions, you can unlock the gear exchange in Pyros for the Elemental gear. You can then trade Pyros Crystals to the Expedition Artisan (don't worry about it not glowing yet! that'll come in hydatos). Each armor piece is 40 crystals, meaning you will need 200 for a full set.
When you reach elvl 42, you can start Reflect farming, if you feel adventurous. Near the Carbonatite Quarry Aetheryte you can find elvl 48 Pure White Flame enemies, which will only cast magic for their attacks. They aggro to touch and casting spells. What you'l want to do is make several Reflect L Logos Actions and remove all your equipment. Next, you'll want to remain at a small distance while casting Reflect before going into the group of Pure White Flames, and then cast it again while your buff is still up. Do NOT let your debuff expire, unless you have someone willing to rez you :'D The attacks can and will instantly kill you if your debuff runs out, so keep an eye on the amount of casts you have left. It can take some practice, but it will get you from elvl 42 to 47-48 in about 20 minutes. I have a video where I clumsily do my first attempt on reflect farming here.
Upon entry you can talk to Krile, then talk to Krile again in The Living Foundry just to the north. Then return to the center of Northpoint and talk to Gerolt and then Drake. Use the Logos Manipulator to unlock it, select the Paralyze L logogram and extract the mneme. Talk again to Drake. Talk to Krile. Travel to x27.7, y27.1 in Northeastern Ice Needles and interact with the confluence, then return and talk one last time to Krile.
Once you reach elvl 37, you can attune to the Aetheryte at The Dragon Star Observatory.
Once you reach elvl 38, talk to Krile and then Drake. Head to The Surgate Town House and interact with the "Promising Scrap" at x18.6, y30.6. Return and talk to Drake and unlock additional capacity with the logos manipulator. Then talk to Krile again. Head to The Firing Chamber at 23.8-17 and interact with the confluence. Talk to Krile to complete the quest.
Once you reach elvl 39 you can attune to the Aetheryte at The Firing Chamber.
Upon elvl 40 you can do another quest. Talk to Krile and head over to West Flamerock at x17.2, y11.6 and pick up the confluence. Once you have done so, return to Krile to complete the quest.
Upon reaching elvl 41 you can attune to the Aetheryte at Carbonatite Quarry.
Upon reaching elvl 45 you can do another quest. Talk to Krile and after a few cutscenes, speak with her again at The Living Foundry.
Upon reaching elvl 50 you can do the final quests to unlock Eureka Hydatos. Talk to Krile and then proceed to pick up the confluence at East Flamerock - x34.0, y7.3. Return to Krile and speak with her before travelling south to The Cavern of the Second Cant - x14.5, y37.6.
Click this link for a more extensive guide on the quests in Pyros.
To finish your weapon in Eureka Pyros you will need 5 Penthesilea's Flame and 650 Pyros Crystals. Penthesilea's Flame drops from the elvl 50 NM Lost Epic.
Other special drops in Pyros include:
Housing items, materia, triple triad cardsBallroom Etiquette - Ideal Gossip (/scheme emote)Samurai bardingCalca, Dhalmel Calf, Wind-up Elvaan minionsModern Aesthetics - Form and Function (hairstyle)Eldthurs Horn (mount)Archaeodemon Horns (glamour)
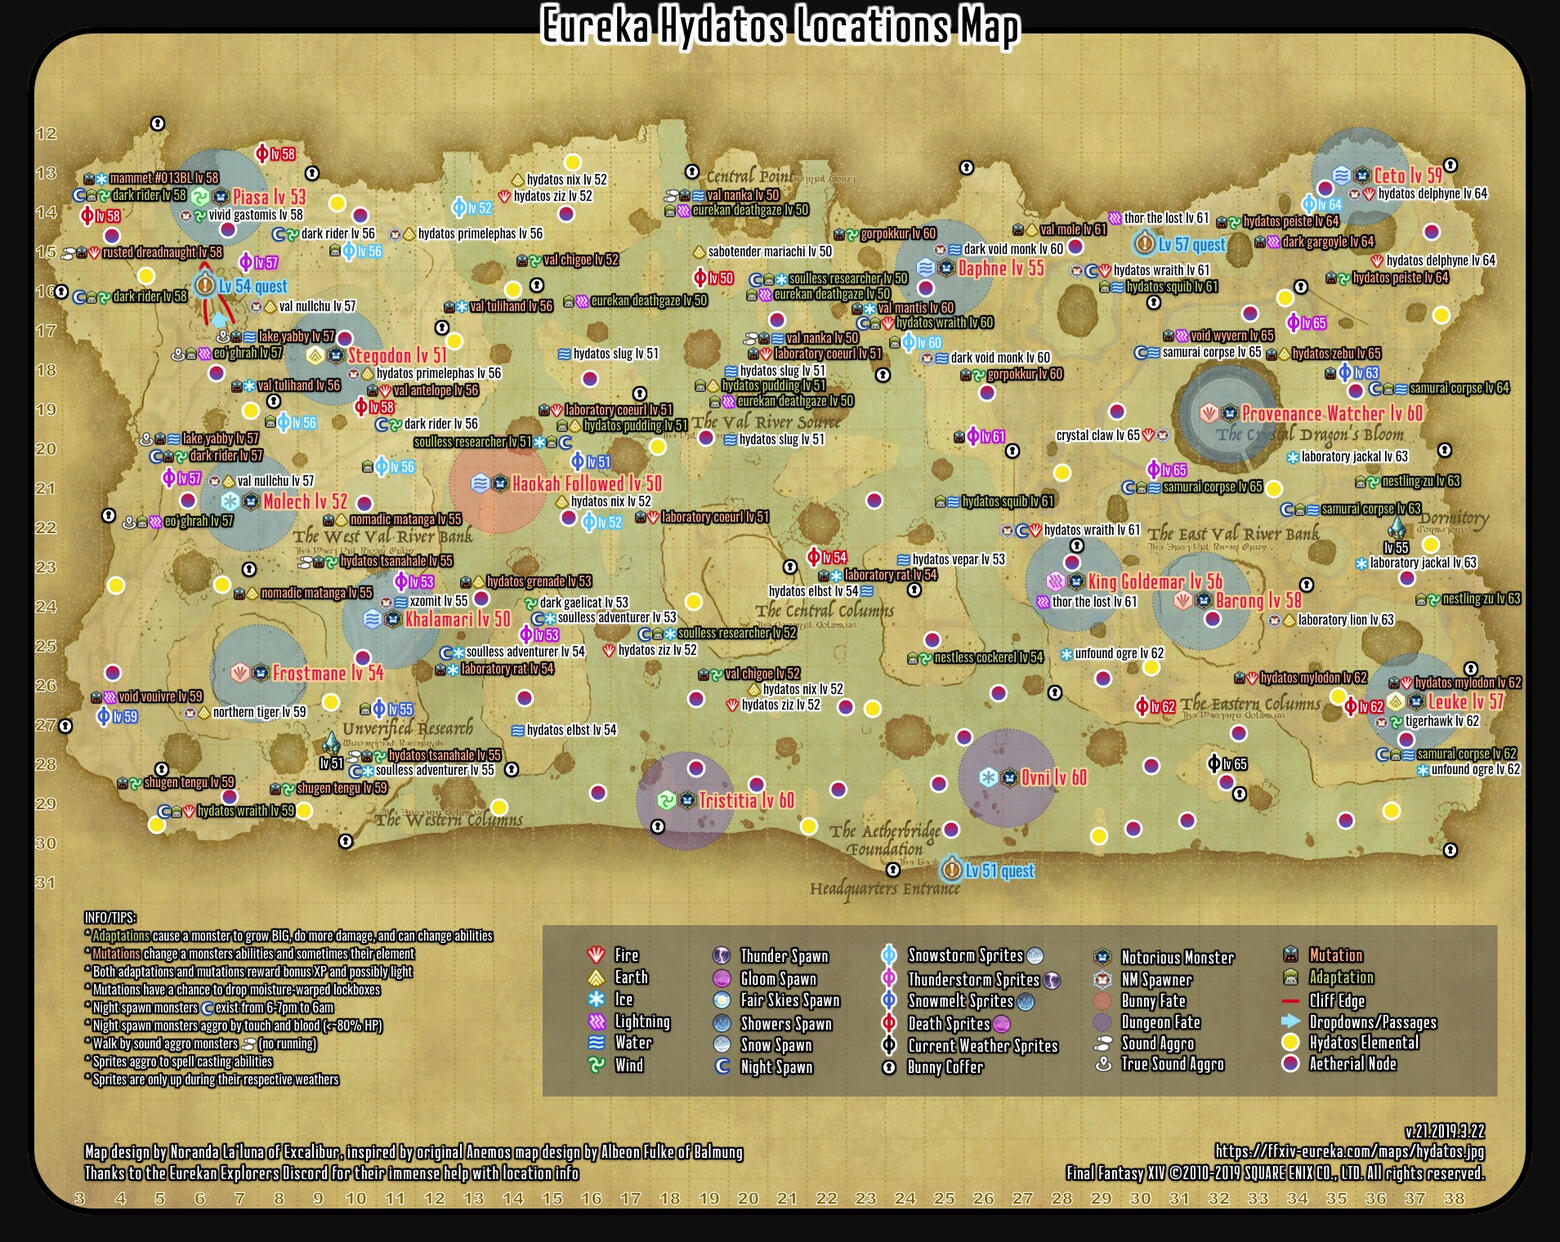
Hydatos
Map originally uploaded by WHM on reddit here.
Welcome to Hydatos!
You might notice that this map is a lot more friendly than the other Eureka maps you've visited before. There are no cliffs, no sleeping dragons and there's lots of space between most mobs, making it easy to travel here. Unfortunately, Hydatos does have a lot more grind to it if you're going for those sweet crystals. Expect to stick for a while if plan on completing any weapon or gearset here. Like Pyros and Pagos, Hydatos has it's own Bunny FATE, called Drink me.
Hydatos also introduces new logograms, the Obscure Logogram. This is used to craft the final 6 Logos Actions. You can obtain these Logograms from certain NM's (Khalimari, Stegodon, Molech), hitting 30 on a mob chain above your level, and finally, from chests inside the Baldesion Arsenal.
Like Pyros, you can reflect farm in Hydatos as well, on multiple locations. You can start as soon as you are on e lvl 52 and above. The ones I know are around (X: 4.0 Y:13.8) on the e lvl 58 Mammets during daytime with clear skies, simply keep running to avoid their AOE's and make sure you never do this during any other weather and time, because they will mutate. The other location is at (X: 32.0 Y:38.5) on something we Eurekans like to call Sprite Island. During any extreme weather e lvl 65 Sprites will spawn here and you can reflect farm them as soon as you hit e lvl 58.
In Eureka Hydatos, it is also possible to get a seventh Magicite. This is done by trading in the following drops:
Ceto's Claw from the Stone-Cold Killer NMGoldemar's Horn from the Duty Free NMMolech's Horn from the Bullheaded Berserker NMAgain, to get any of these drops, you must be 1 elvl below or higher than that compared to the the NM. If you're however willing to spend Gil, you can also just buy these items of the Marketboard.
To finish your Relic Weapon, you must trade in total 350 Hydatos Crystals and 5 Crystalline Scale to Gerolt, so get ready for a grind. Additionally, you can get the Eureka Effect on your weapon by trading in an additional 100 Eureka Fragments, received from the Baldesion Arsenal. This will upgrade your weapon to be stronger in Eureka only, not anywhere else. It will also not switch appearance.
Crystalline Scale drops from the NM Provenance Watcher, also called PW.
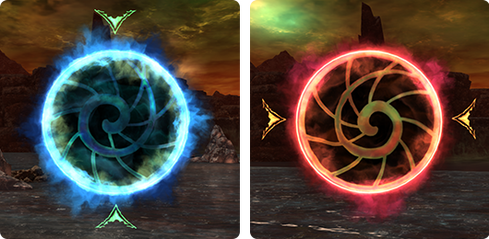
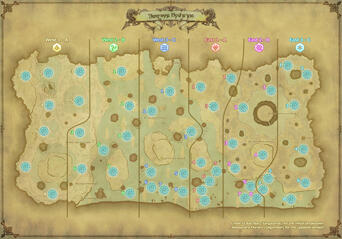
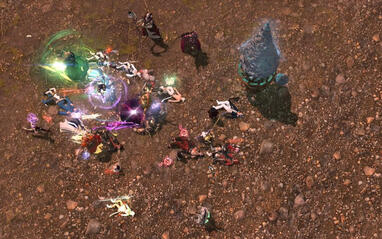
Something else notable about Eureka Hydatos is the NM Ovni. Ovni and his FATE I don't want to believe spawn about every 30 minutes as long as there are more than 8 people at e lvl60 in the instance, and as long as no one enters the Baldesion Arsenal. No one needs to 'rep Ovni', he just spawns and the weather will change to Umbral Turbulence along with a notification. (in a locked instance, Ovni does not spawn) Ovni gives a decent chunk of EXP and 10 Hydatos Crystals if you're at the right e lvl. Ovni is also the thing you need to beat to enter the Baldesion Arsenal. To beat Ovni, someone needs to bring the Dispel L Logos Action, or else Ovni will gain a dmaage up stack after each Fluorescence and kill you all. Once Ovni is beaten, 48 blue portals (unstable portals) will spawn in Hydatos Nodes. After a while they will turn red (stable) (picture in links and images section). These are only relevant once you have beaten the Eureka storyline and are looking to go into the Baldesion Arsenal, so I will explain more about them later.
If the Baldesion Arsenal is being done, a support FATE will spawn in Hydatos as well. This will need to be beaten to secure victory for those within the Baldesion Arsenal. It will give a whopping 30 crystals and spawn an additional set of 8 portals once completed. Again, someone will need to bring Dispel L for this NM to be beatable. You will need to Dispel any time you see Shock Spikes and Mighty Strikes.
Eureka Hydatos also has it's own Warped lockbox, called the Moisture-Warped Lockbox.
About the quests. Upon entry, you can talk to Krile and then, after a cutscene, to Gerolt. After another cutscene, speak again with Krile. Upon finishing the quest, you can speak with Gerolt again to begin purchasing the Hydatos weapons; you must have a matching, finished Pyros weapon to do so.
Upon reaching elvl 51 Talk to Krile. Head to The Central Columns at 20.3-24.8 and talk again to Krile. Head south to The Val River Source 25.7-30.7 to find the Pooled Aether. Return to the The Central Columns and speak to Krile. You can now attune to the Aetheryte at Unverified Research.
Upon reaching elvl 54. Talk to Krile. Head to The Western Columns at 10.6-29.6 and talk to Krile again. Head to The West Val River Bank 6.5-15.7 to find the Pooled Aether after walking up the large column. Return to The Western Columns at 10.6-29.6 and talk to Krile.
Upon reaching elvl 55 you can attune to the Aetheryte at the Dormitory.
Upon reaching elvl 57, talk to Krile at the The Western Columns at 10.6-29.6. Then head east to The Eastern Columns at 31.3-27.2 and talk to Krile again. Head north to The East Val River Bank at 30.8-14.4 to find the Pooled Aether. Return to The Eastern Columns at 31.3-27.2 and talk to Krile.
Upon reaching the level cap, elvl 60, you can talk to Krile at the The Eastern Columns at 31.3-27.2. Head to The Aetherbridge Foundation at 24.0-30.6 and talk again to Krile. Head into the Headquarters Entrance and talk to Krile, then talk to her again in the Board Room. Interact with the Scattered Tomes and talk again to Krile for a few lengthy cutscenes. Choose between Krile's path (sealing) or that of Ejika Tsunjika (destruction) for another cutscene. Return to Central Point and talk to Ejika Tsunjika (when doing Krile's path) or Krile (when doing Ejika's path) to complete the quest.
Click this link for a more extensive guide on the quests in Hydatos.
Some special drops in Hydatos include:
Orchestrion rolls, Housing items, crafting materials, Triple Triad cards,Yukinko Snowflake minionAbsolute Lance, Penthesilea's Spear (DRG weapon glams)Ballroom Etiquette - Overzealous Affirmations (/fistpump emote)Shantotto's Staff (BLM weapon glamour)Eurekan Petrel Horn (mount)Items to ease entry into the Baldesion Arsenal
PS: if you see a lot of people zoning into Hydatos at once, that means there's probably a BA run happening. If you have it unlocked, you can shout for an invite if the run has room left :D At the same time, it also means Ovni won't spawn for another hour or longer, and NM's in the instance will get harder to kill.
The Baldesion Arsenal
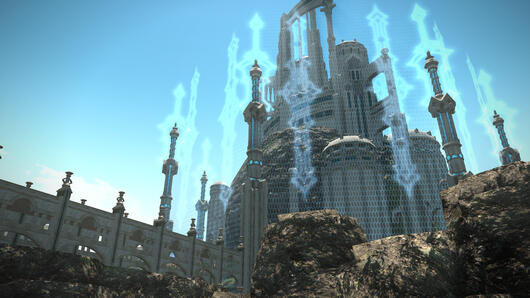
DISCLAIMER: Do not enter BA alone. Do not enter BA for 'fun or memes or even to simply look', you will Die and Delevel. Anything that is not a tank in full defensive Magia can and will be killed by a single mob attack. And not only that, you will also prevent Ovni from spawning in the instance, hindering others on their EXP gain and Crystal farming. Generally speaking, do not enter the Baldesion Arsenal unless you are prepared.
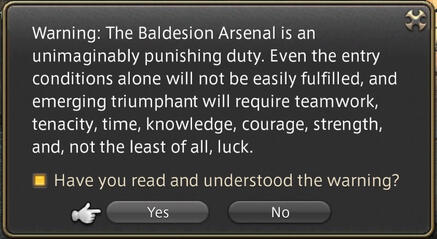
To unlock the Baldesion Arsenal (BA!), you must speak with the Expedition Scholar in the Hydatos base camp after finishing the Eureka storyline. You will know you have BA unlocked when the game gives you the following warning (picture in links and images section):
Warning: The Baldesion Arsenal is an unimaginably punishing duty. Even the entry conditions alone will not be easily fulfilled, and emerging triumphant will require teamwork, tenacity, time, knowledge, courage, strength and, not the least of all, luck. Have you read and understood the warning?
Once you click yes and confirm that you have understood the warning, you will be able to fulfill the requirements to enter BA.
You might remember the portals that spawn after Ovni's FATE is completed. These are the Baldesion Arsenal entryways. If you complete Ovni's FATE with a gold ranking, you will receive a blue buff if you have BA unlocked, called Aetherially Primed. After Ovni dies, the 48 portals will spawn within a few minutes. With this buff, you will be able to enter one of the portals once it turns red. If you want to enter a blue portal, you will need to trade in either:
An Aetherially Conductive Plate + a Hydatos Cluster + a Sharlayan Aether OilOR
100 Anemos Crystal + 100 Pagos crystal + 100 Pyros Crystalto the expedition scholar in the Hydatos Base Camp. With this you can stabilize a portal and enter it before it turns red on its own. (or you can just simply wait. it'll turn red and you'll be able to enter anyways LOL) It takes about a few minutes for them to turn red once they have appeared.
Once you're in the Arsenal, you'll be afflicted by a debuff which prevents anyone from being Raised. You can only be rezzed with a Healer Limit Break Level 3 (healer LB3), the Logos Action Spirit of the Remembered activating (has a 70% chance of activating upon KO) and a healer casting Sacrifice L on you. There is also no echo active in BA and if you do not get a rez, you will have to take the loss of EXP, return to the Hydatos Entrance and delevel.
In BA, the mobs are extremely dangerous. They can kill anything that is not a tank in +5 defensive Magia in 1 hit and often have dangerous abilities. Some mobs will need to be put to sleep, others will need to be stunned, and a lot of them have invisible AOE's and Cleaves. Many mobs can be found on stairs, on which their AOE telegraphs will appear smaller than they actually are. Always dodge extra if you are avoiding an AOE on a staircase.
There will also be trap that can kill players if they step on them, so let players with the Perception L action discover them for you first.
If you enter the Baldesion Arsenal without any elemental gear, it is highly recommended to have 4 Magia in offense and 1 in defense, except for tanks who are establishing aggro, they will need to be in fully defensive Magia.
If you enter BA, you might notice a drop-down ledge. Do not instantly drop down, but make sure you are on the correct side first since you will need to split your group in two. Make sure every group has tanks, healers and DPS. Make sure you have every Logos Action you need, and switch your Magia appropiately for your class with the Magia Melder.
Once everyone is ready, you can start clearing out the first trash mobs one-by-one. Take care with the Arsenal Byblos to not stand in front of it or behind it. You will arrive at either the boss Art or the boss Owain depending on which side you dropped off.
You will fight one of these while other players fight the other, and need to get both of them to 1HP before they can be killed at the same time. After that, you'll continue through hallways.
Use Perception L to find any traps ahead here. Silence and stun the Sprites that cast Banish as it willl remove you from the Arsenal. Death L any arsenal Calcabrina's as they have a huge invisible frontal cone AOE as well as a raidwide AOE. Dispel or Repose (sleep) the Centaurs when they cast Berserk, or they will kill everyone. Organize together at the boss Raiden.
After Raiden you can head into more hallways with traps, and you can find a treasure chest in one of the six rooms (each room will have mobs of a single element, and traps) in the hallway with 6 rooms. After you collect that, use Perception L to find a small portal (a small white circle). The portal will always be touching a trap, so watch out. It will lead you into an identical hallway with another 6 rooms and a blue switch/portal that can be activated. Do not activate it yet. Split up in 6 parties and ensure there are enough healers/tanks alive to do this. Touching the blue portals will lock the rooms for a while. Let your tanks touch the blue portals at the same time and kill the mobs (same element as the mobs that were in the room before) that appear. Now you can leave your rooms again.
You will notice that an Avatar of Absolute Virtue has spawned somewhere in Hydatos! will pop up as a message, signaling that the NM FATE The Baldesion Arsenal: Expedition Support has spawned. If you plan on beating the next boss, Absolute Virtue (AV), this FATE will have to be completed first.
To the players that are doing this FATE, bring at least 1 Dispel L Logos Action and dispel any Shock Spikes and Mighty Strikes.
Now you can start beating up AV.
After AV, here will be a short hallway leading up to Ozma that is believed to be trap-free. It contains two Arsenal Strix. Do not DoT them but kill them slowly so you can build more Limit Break Gauge. Stun or silence their cast as it will dispel your own buffs, including Spirit of the Remembered.
Organize at Ozma. Make sure you have two tanks, a healer and more on each platform. Ozma will use many different abilities to try and kill you. Ozma will also suck you out of the Arsenal if you are not standing on a button and have the Black Hole Debuffer buff during his Sphere transformation phase. If not every button is covered by someone, everyone will get sucked out. If you die and the battle keeps going, you will be sucked out by Black Hole and need to start over again. You will be tossed out into the Hydatos Base Camp, so you ask people to get ready and rez you if you get sucked out. If you are KO when Ozma dies, you will not get the achievement that you need for the mount.
The Baldesion Arsenal drops include:
Damascene cloth, Cryptic Seal (rare, 1 of each guaranteed on Ozma)Conditional Virtue minion (rare)Great Shin-Zantetsuken (DRK glam, rare)Shin-Zantetsuken (SAM glam, rare)Turmoil Orchestrion roll (ozma guaranteed drop)Eureka Fragments (used to upgrade your +1 Elemental gear into +2)
There are many different guides on BA and different data-centres tackle it differently. I suggest reading through the guides of others from your respective server if you wish to complete it. I will link a few of them here.
Gamerescape, contains boss attacks and loot table.
FFXIV-eureka BA visual guide, contains boss guides, enemy list and logos actions
Gamerstips Guide, contains bosses, mobs, their attacks & how to deal with them
Finalfantasy.fandom guide, contains bosses, mobs, their attacks & how to deal with them
Here are also links to my clear videos in the Baldesion Arsenal:
ArtOwain, note that I am reflecting Owain and that I can only stand inside his AOE's because of this.RaidenAVProto Ozma
Links and Images
Ffxiv-eureka is by far the most useful tracking website you'll encounter while going through Eureka. Use this to track which NM's have been downed, which ones you can prep, what the weather conditions will be, what logograms you still need and how to make them, and share your own trackers with others. (don't forget to share the password as well if you share a tracker)
There are a fair amount of discord servers out there running BA and Eureka farms. Here are invite links to some of the more known ones.
Aether BA ServerCAF, Crystal Adventuring ForaysCEM, crystal exploratory missionsPrimal BA ServerEureka Callouts ServerLight Eurekan Academy BA ServerCitadel of Light serverChaos BA ServerEurekan Explorers Discord
Below I will link various trackers, sheets and other helpful images.
Eurekan Explorers fandom wiki page, includes guides to leveling, BA and moreIncredibly complete Bestiary of Mutations, Adaptations & abilities for Warped-lockbox Farming, includes NM's as wellEasy Sprite Challenge Log locations in AnemosEasy Anemos Challenge LogRelic Steps for the Relic Weapons in EurekaMy guide for Warped lockbox farming, which might still be under construction
Finally, I'd like to add some personal commentary, if you're still reading at all. If you're feeling anxious about having to party up, don't worry too much! Eurekans are generally very nice and patient. As long as you don't early pull NM's on purpose or portal snipe, it's all good. People hop in and out of parties frequently for whatever reason. If you shout your <pos>, most people will be willing to rez you.
Here is my twitter, where you can ask me anything relating to Eureka and I'll attempt to answer you.
Below are images of things I described earlier because carrd didnt let me make more elements. In order;
The Elemental EXP buff Fairy in PyrosNM FATE as shown on the mapmy current magia board set to 5/2 for Earth mobsa sleeping Frozen Void DragonLouhiAn Unstable red portal and a Stable blue portal in HydatosThe Baldesion WarningThe map of portals used by the Aether Baldesion Arsenal DiscordAVthe results of an Ozma Wipe
